
I've been meaning to start this thread for a while, but it seems when I get some time, I'm usually working on the Patrol, rather than posting here. So... some of this will be catching up to current events.
Some background: I was looking for an older truck to work on - mostly as a project to work on, for the sake of learning and for the sake of something that gets me away from work and other responsibilities. I didn't go looking specifically for the Patrol, but I've always liked more rare and unusual cars. So far, I'm happy with my decision, and the community (almost all here), has made it an even better experience.
My knowledge of cars is fairly limited - I've done basic stuff and have been around engines being rebuilt, but haven't actually done it myself. So... this was as much of a learning experience as much as anything.
My goal is somewhat undefined - I want it to be good and reliable as a first priority and "mostly" stock as a second priority, depending on price, effort, availability, etc.
I picked up the 1967 Patrol that apparently had made the rounds several times around here and Craigslist:
ckhorne's 1967 project
-

- You know you own a Patrol when…

- Posts: 190
- Joined: Wed Jan 01, 2014 2:14 pm
- Location: Atlanta, GA, USA
- Has thanked: 49 times
- Been thanked: 141 times
Re: ckhorne's 1967 project
The Patrol was drivable for the ~60 mile journey home, although it was apparent that several things needed some attention to make it easier. The interstate was... scary. The PO had not only put in a CJ5, but locked the rear axles together. Couple this with a short wheelbase, and making turns was a handful (and noisy from chirping of the inner tire). There was enough play in the steering wheel that it was hard to even tell when it was engaged - maybe 6" of slop. Lastly, my buddy following me said that every bump I hit resulted in both a plume of rust and a splash of gasoline.
So... I started with the steering - mostly because it was easiest. This was a matter of removing the adjustment links, cleaning out the ball ends, and reassembling with new grease. 45 years of dirt and grime made it a lot more difficult than it should have been... something that seems to keep coming up...
Not much to show on this one...
So... I started with the steering - mostly because it was easiest. This was a matter of removing the adjustment links, cleaning out the ball ends, and reassembling with new grease. 45 years of dirt and grime made it a lot more difficult than it should have been... something that seems to keep coming up...
Not much to show on this one...
You do not have the required permissions to view the files attached to this post.
-
- You know you own a Patrol when…
- Posts: 190
- Joined: Wed Jan 01, 2014 2:14 pm
- Location: Atlanta, GA, USA
- Has thanked: 49 times
- Been thanked: 141 times
Re: ckhorne's 1967 project
Next up was the locked axles. I looked around for about a month for a Patrol replacement rear-end, but couldnt' find one that was even on this side of the country.
So... I decided to make the best of the CJ5 rear end (Dana 44 in my case). This started with removing the rear diff cover:
and seeing this:
Yup- they did a Lincoln Locker - both sides, and pretty messy. Whoever did this was intent on a full diff lock for off-roading. And, admittedly, it did work. Just not the easiest thing to undo.
So I was able to find some carrier group gears for a Dana 44 on ebay for 50 bucks. I removed the axles, became buds with my grinder (with a cutting blade), and two hours of grinding later, cut out the old gears, and slid in the new ones.
Bolted it all back up, and it all worked like a charm.
So... I decided to make the best of the CJ5 rear end (Dana 44 in my case). This started with removing the rear diff cover:
and seeing this:
Yup- they did a Lincoln Locker - both sides, and pretty messy. Whoever did this was intent on a full diff lock for off-roading. And, admittedly, it did work. Just not the easiest thing to undo.
So I was able to find some carrier group gears for a Dana 44 on ebay for 50 bucks. I removed the axles, became buds with my grinder (with a cutting blade), and two hours of grinding later, cut out the old gears, and slid in the new ones.
Bolted it all back up, and it all worked like a charm.
You do not have the required permissions to view the files attached to this post.
-

- Administrator

- Posts: 2460
- Joined: Wed Jul 03, 2013 11:49 pm
- Location: Arizona
- Location: Arizona
- Has thanked: 800 times
- Been thanked: 1269 times
- Contact:
Re: ckhorne's 1967 project
Sounds like you have your priorities straightckhorne wrote: it seems when I get some time, I'm usually working on the Patrol
From what I see you've done an awesome job returning that rear diff to normal operation.ckhorne wrote:
My knowledge of cars is fairly limited - I've done basic stuff and have been around engines being rebuilt, but haven't actually done it myself. So... this was as much of a learning experience as much as anything.

The Dana 44 is a stout rear axle- every bit capable enough to handle the P engine's 225 lbFt or torque. Looks like it was done correctly.I like how they even used shock mounts that will work with standard Patrol post end shock absorbers...

I also assume that rear brake parts will be somewhat easier to come by in the US with that setup.
A very cool rig - for sure... It will only get better with all the time and attention you are giving it
L-R:
White 65 Hardtop L60-3-00617 (undergoing restoration)
Red 65 hardtop 4L60-002565 (scrapped for parts)
66 Hardtop "El-Bondo Patrol", L60-00511 (Restored, then sold June2020)
Blue 67 Hardtop (sold March1997)
Green 62 Softtop L60-2-00504 (undergoing restoration)
-
- You know you own a Patrol when…
- Posts: 190
- Joined: Wed Jan 01, 2014 2:14 pm
- Location: Atlanta, GA, USA
- Has thanked: 49 times
- Been thanked: 141 times
Re: ckhorne's 1967 project
After the diff was back together, I decided to do some painting with POR-15. This started with just the rear diff, and when I was under there, I started looking around, and decided that pretty much everything under the Patrol should be painted. Yes, I realize there are aluminum parts, but it makes me feel better to have a coat of paint on them. Several miserable evenings of using a wire wheel to remove thick, thick coats of dirt, grease, and whatever other gunk under there, and I had a clean underbody:
I don't seem to have a picture of the finished product, but rest assured that the Patrol now looks much better underneath than it does from the outside now...
I moved onto the gas tank. I wanted a larger tank, so I started with several quotes on custom making a tank. They were $1000-1500, so I looked for other options. I found a poly tank made by MTS that would just fit into the space I had, and would be 33gal (!). The MTS4251C has the proper size, hole placement, and the bonus is that the fuel sender unit is the same 0-90 ohm range that our Patrol gauges need. It also happened to be $130. A few steel bands from Home Depot and I was able to get it all mounted.
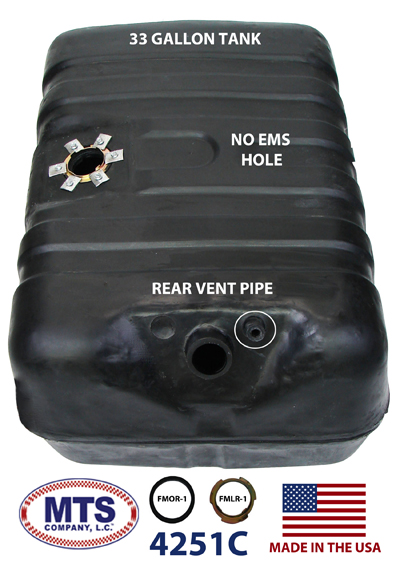
Please note that I don't have a standard Patrol rear-end and don't have any way to know if this tank will work in a normal configuration, but hopefully it's useful as a point of reference for someone.
I don't seem to have a picture of the finished product, but rest assured that the Patrol now looks much better underneath than it does from the outside now...
I moved onto the gas tank. I wanted a larger tank, so I started with several quotes on custom making a tank. They were $1000-1500, so I looked for other options. I found a poly tank made by MTS that would just fit into the space I had, and would be 33gal (!). The MTS4251C has the proper size, hole placement, and the bonus is that the fuel sender unit is the same 0-90 ohm range that our Patrol gauges need.
It also happened to be $130. A few steel bands from Home Depot and I was able to get it all mounted. Please note that I don't have a standard Patrol rear-end and don't have any way to know if this tank will work in a normal configuration, but hopefully it's useful as a point of reference for someone.
You do not have the required permissions to view the files attached to this post.
-
- You know you own a Patrol when…
- Posts: 190
- Joined: Wed Jan 01, 2014 2:14 pm
- Location: Atlanta, GA, USA
- Has thanked: 49 times
- Been thanked: 141 times
Re: ckhorne's 1967 project
Thanks - I was a little concerned I'd be shown the door on the forums for having a Frankenstein Patrol...moore_rb wrote:From what I see you've done an awesome job returning that rear diff to normal operation.

Indeed - I left that out since it's not really Patrol related - I was able to rebuild the rear brake cylinders by just going down to NAPA. Standard parts do have their advantages.moore_rb wrote:I also assume that rear brake parts will be somewhat easier to come by in the US with that setup.
Next up was the getting the engine and tranny out for a rebuild. And when I planned to take it out, I decided re-wiring it at this point would be best. The wiring looked rough. Both from time and from being jerry-rigged over time, with unmarked wires going everywhere. Some prime examples:
I decided to just replace everything with a new harness. Too many of the wires were frayed, re-crimped too many times, and otherwise just a recipe for a fire. I went with a Painless Performance 12 (/21) circuit harness (#10102), purchased from Amazon (here). I also picked up some braided sleeve in 1/4", 1/2", and 3/4" sizes, heat shrink, and some waterproof connectors.
You do not have the required permissions to view the files attached to this post.
-
- You know you own a Patrol when…
- Posts: 190
- Joined: Wed Jan 01, 2014 2:14 pm
- Location: Atlanta, GA, USA
- Has thanked: 49 times
- Been thanked: 141 times
Re: ckhorne's 1967 project
I debated on where to put the new fuse panel, and finally decided to mount it in the glovebox instead of the original location. It's more secure, out of the elements, and ended up working out much better for wire management. First up... clean up the rusty glovebox. Out comes the POR-15 again... this time the grey-
Yes, those extra two holes are from rust. If they were structural, I'd be more concerned, but I'll make a rubber mat to cover the bottom of the glovebox at some point.
The original covering over the defrost hoses were shot, so I replaced them with some heat-shrink fabric that someone else mentioned on another thread. Only one was enough - I needed about 5' of it, and it worked perfectly. And it's some of the coolest stuff I've used in a while.
Here's a picture of the center console, with all three panels removed for access:
The new fuse panel is mounted in the glovebox, and the wiring is run first to the middle compartment, where they can be pulled to the correct location. There are holes for the defrost hoses - I used those, but cut some 1/4" fuel line lengthwise and wrapped within the holes to make grommets. The wiring for both the dash and the engine bay were pulled again through the other compartment. Wires for the front and rear lights were pulled through a new hole I made behind the middle compartment (through the bulkhead).
this time the grey-Yes, those extra two holes are from rust. If they were structural, I'd be more concerned, but I'll make a rubber mat to cover the bottom of the glovebox at some point.
The original covering over the defrost hoses were shot, so I replaced them with some heat-shrink fabric that someone else mentioned on another thread. Only one was enough - I needed about 5' of it, and it worked perfectly. And it's some of the coolest stuff I've used in a while.
Here's a picture of the center console, with all three panels removed for access:
The new fuse panel is mounted in the glovebox, and the wiring is run first to the middle compartment, where they can be pulled to the correct location. There are holes for the defrost hoses - I used those, but cut some 1/4" fuel line lengthwise and wrapped within the holes to make grommets. The wiring for both the dash and the engine bay were pulled again through the other compartment. Wires for the front and rear lights were pulled through a new hole I made behind the middle compartment (through the bulkhead).
You do not have the required permissions to view the files attached to this post.
-
- You know you own a Patrol when…
- Posts: 190
- Joined: Wed Jan 01, 2014 2:14 pm
- Location: Atlanta, GA, USA
- Has thanked: 49 times
- Been thanked: 141 times
Re: ckhorne's 1967 project
For the wiring, I really tried to pay attention to details. All wires are supported. All holes grommetted. All connections soldered and heat shrunk (no crimping here!). When possible, all wires are run through the expandable braid (it's hard to cut that stuff even with a razor blade). In the engine bay, I even put heat shrink over the metal clamps that hold the wires in place.
I also cleaned up and painted the engine bay while the engine was out. POR-15 grey seemed to match the original grey of the engine bay, so worked well.
This is the two runs coming out from to the rear lights (left bundle) and the front lights and horns (right bundle):
The main engine wiring bundle:
Waterproof connectors to each of the parking/turn lights:
I also cleaned up and painted the engine bay while the engine was out. POR-15 grey seemed to match the original grey of the engine bay, so worked well.
This is the two runs coming out from to the rear lights (left bundle) and the front lights and horns (right bundle):
The main engine wiring bundle:
Waterproof connectors to each of the parking/turn lights:
You do not have the required permissions to view the files attached to this post.
-
- You know you own a Patrol when…
- Posts: 190
- Joined: Wed Jan 01, 2014 2:14 pm
- Location: Atlanta, GA, USA
- Has thanked: 49 times
- Been thanked: 141 times
Re: ckhorne's 1967 project
And as a result of both the looms and moving the fuse panel (and a coat of paint), the engine bay is now a lot cleaner:
(Yes, I have some touchup to do - the electric fuel pump worked too well and stripped my paint off overnight...)
The glovebox was closed up, but the dash panels still need some sanding and paint:
And I've still got a couple remaining things to work on, so the center panel is left open. Note that the extra wires have been looped and zip tied to keep everything tidy and accessible.
In all, I'm very pleased at how the wiring turned out. I won't win any concours event for being original Nissan, but I'm not worried about anything catching on fire now, either. If someone reading this decides to tackle this project, budget several weeks of time and expect a fair amount of frustration at times. It was worth it, but a bigger undertaking than I originally expected. Pay attention to grounds, and test as you go. Also note that none the original relays are needed with the Painless harness. The only original electrical part that I re-used was the regulator going to the gauges. I attempted to take notes, but most of it was just following the tables in the wiring harness's manual. I also found it easier to just remove all the existing wiring and start fresh than to trace what was already there. The electrical schematics for the truck help, but do have their inaccuracies, so be mindful. Total cost of wiring, connectors, heat shrink, etc, etc was around $500.
(Yes, I have some touchup to do - the electric fuel pump worked too well and stripped my paint off overnight...)
The glovebox was closed up, but the dash panels still need some sanding and paint:
And I've still got a couple remaining things to work on, so the center panel is left open. Note that the extra wires have been looped and zip tied to keep everything tidy and accessible.
In all, I'm very pleased at how the wiring turned out. I won't win any concours event for being original Nissan, but I'm not worried about anything catching on fire now, either. If someone reading this decides to tackle this project, budget several weeks of time and expect a fair amount of frustration at times. It was worth it, but a bigger undertaking than I originally expected. Pay attention to grounds, and test as you go. Also note that none the original relays are needed with the Painless harness. The only original electrical part that I re-used was the regulator going to the gauges. I attempted to take notes, but most of it was just following the tables in the wiring harness's manual. I also found it easier to just remove all the existing wiring and start fresh than to trace what was already there. The electrical schematics for the truck help, but do have their inaccuracies, so be mindful. Total cost of wiring, connectors, heat shrink, etc, etc was around $500.
You do not have the required permissions to view the files attached to this post.
-

- Administrator
- Posts: 1225
- Joined: Sun Jul 28, 2013 12:45 am
- Location: Roseville, California
- Has thanked: 646 times
- Been thanked: 1149 times
- Contact: